Wednesday, October 30, 2013

Deploy AV via Kaspersky Security Center

Antivirus software deployment Kaspersky Security Center


Kaspersky Security Center is designed for centralized execution of basic administration and maintenance tasks in an organization's network. The application provides the administrator access to detailed information about the organization's network security level; it allows configuring all the components of protection built using Kaspersky Lab applications.
Kaspersky Security Center is aimed at corporate network administrators and employees responsible for anti-virus protection in organizations.

Let us take a look at the main GUI screen of the Kaspersky Security Center Console.


The main tree windowed task we are interested is the Managed Computers option. Using this option we can collect information from the complete enterprise domain, or a simple workgroup. This information is useful to see whether the current updated AV is instaled, or are the updates and AV definitions installed. I have created a group, and added a local PC to the list.


To deploy a new version of Kaspersky Antivirus Software we can use the Network Agent or the shared folder for the installation. As simple as it can be , we can use the install software option to install the new version of Kaspersky AV on this targeted computer.


As we can also see, there are a few more great options we can use on this tab. We can define multiple tasks, such as virus scan, vulnerability detection, AV antivirus database update and much more. I have chosen to install the new version of the application to the user PC. 


We can see now that the AV was installed in the background and it is up and running. On cool thing more about the software is that you can read all the info about the hardware from the registry inside a client PC. This is sometimes needed in a case of upgrading the AV software, that prevents choking up the PC resources. 

I was very glad to present you this cool management tool.

Feel free to comment.

LINUX Package Cheatsheet

LINUX Package Cheatsheet 


GUI Package management tools are neat and nice to use. My opinion is that generally GUI on the Linux boxes are a security and performance problem. IT people that are managing their Linux boxes usually use the command line for the every day tasks. Good practice in this is ok when a user has a broken down X session and cannot establish a GUI interface to his/hers box.

I would like to start and describe a Yellowdog Updater, Modified, which is used in distributions like Fedora, Centos and RedHat for package managament.
First encounter is a simple installation and removal of single and multiple packages. Yum also checks for dependencies and installs them automatically. Here are some simple bash commands:

yum install package1
yum remove package1
yum install package1 package2 package3
yum remove package1 package2 package3

To update a installed package with a new version:

yum update package1

To fetch via online repos and list all the updates for installed packages:

yum list updates

To update the whole system:

yum update

Package searching, two options, if the name is known and if it is not:

yum list package1

yum search packa*
yum search *ackage1

YUM also provides us with a group install of package group with dependencies:

yum groupinstall "FTP Server"


I would also like to introduce the RPM, a powerful package manager for Centos, Redhat and Fedora. This package manager is much faster.

The syntax is similar to the yum, with some small parameter configs. Here is a sample of installation a mozilla mail package on a linux server:

rpm -ivh mozilla-mail-1.7.5-17.i586.rpm

We can list all the rpm packages install and save them to a list in a textual file:


 rpm -qa | tee package.txt

To erase a package we can use a simple rpm syntax:

 rpm -ev package1


The Aptitude is the package manager for Debian-based Linux distributions including Ubuntu server. Aptitude uses pretty much the same commands as apt-get. It's not a good idea to use both- either use aptitude or apt-get exclusively, or your dependencies will get confused.
Simple starting commands for installing, reinstalling and removing packages:

aptitude install package1
aptitude reinstall package1
aptitude remove package1
aptitude remove --purge package1

The upgrade commands include cache, distro and release upgrade:

aptitude update
aptitude upgrade
aptitude dist-upgrade

Now we could take a look at Software Repositories that we can define as storage locations from where packages can be downloaded and installed. They can be remote and local. We can take a look on the information location where the repositories are configured.


In the past, many Linux programs were distributed as source code, which a user would build into the required program or set of programs, along with the required man pages, configuration files, and so on. Nowadays, most Linux distributors use prebuilt programs or sets of programs called packages, which ship ready for installation on that distribution.

These prebuilt and ready for installation packages are very useful in administering many Linux servers.

Feel free to comment.

Friday, October 18, 2013

OSPF LOAD BALANCING

OSPF LOAD BALANCING


Load balancing is a standard functionality of the Cisco IOS® router software, and is available across all router platforms. It is inherent to the forwarding process in the router and is automatically activated if the routing table has multiple paths to a destination. It is based on standard routing protocols, such as Routing Information Protocol (RIP), RIPv2, Enhanced Interior Gateway Routing Protocol (EIGRP), Open Shortest Path First (OSPF), and Interior Gateway Routing Protocol (IGRP), or derived from statically configured routes and packet forwarding mechanisms. It allows a router to use multiple paths to a destination when forwarding packets.

For this short blog I will use the OSPF protocol. In this example a client has two WAN connections with two broadband routers that both use for Internet routing. We will enable and disable a load balancing of packets that are sourcing from the HOST to the WEB SERVER.   Following the diagram:


Now let us look at the configuration scripts of the routers:

R1
hostname R1
!
ip cef
no ip domain lookup
ip domain name lab.local
!
interface Loopback0
 ip address 10.1.1.1 255.255.255.255
 ip ospf network point-to-point
!
interface FastEthernet0/0
 ip address 192.168.1.1 255.255.255.0
 duplex auto
 speed auto
!
router ospf 1
 log-adjacency-changes
 network 0.0.0.0 255.255.255.255 area 0

R2
hostname R2
ip cef
no ip domain lookup
ip domain name lab.local
!
interface Loopback0
 ip address 10.2.1.1 255.255.255.255
 ip ospf network point-to-point
!
interface FastEthernet0/0
 ip address 192.168.1.2 255.255.255.0
 duplex auto
 speed auto
!
interface FastEthernet1/0
 ip address 172.16.1.3 255.255.255.0
 duplex auto
 speed auto
!
router ospf 1
 log-adjacency-changes
 network 0.0.0.0 255.255.255.255 area 0

R3
hostname R3
!
ip cef
no ip domain lookup
ip domain name lab.local
!
interface Loopback0
 ip address 10.3.1.1 255.255.255.255
 ip ospf network point-to-point
!
interface FastEthernet0/0
 ip address 192.168.1.3 255.255.255.0
 duplex auto
 speed auto
!
interface FastEthernet1/0
 ip address 172.16.1.2 255.255.255.0
 duplex auto
 speed auto
!
router ospf 1
 log-adjacency-changes
 network 0.0.0.0 255.255.255.255 area 0

R4
hostname R4
!
ip cef
no ip domain lookup
ip domain name lab.local
!
interface Loopback0
 ip address 10.4.1.1 255.255.255.255
 ip ospf network point-to-point
!
interface Loopback1
 ip address 99.99.99.99 255.255.255.0
!
interface FastEthernet0/0
 ip address 172.16.1.1 255.255.255.0
 duplex auto
 speed auto
!
router ospf 1
 log-adjacency-changes
 network 0.0.0.0 255.255.255.255 area 0

Now we should see how the HOST router sees the route for the WEB SERVER. That is the 99.99.99.99/32 sub Network that we are interested in LOAD BALANCING.

R1#sh ip route

Gateway of last resort is not set

     99.0.0.0/32 is subnetted, 1 subnets
O       99.99.99.99 [110/3] via 192.168.1.3, 00:12:49, FastEthernet0/0    << LOAD 
                             [110/3] via 192.168.1.2, 00:12:49, FastEthernet0/0          BALANCED >>
     172.16.0.0/24 is subnetted, 1 subnets
O       172.16.1.0 [110/2] via 192.168.1.3, 00:12:49, FastEthernet0/0
                   [110/2] via 192.168.1.2, 00:12:49, FastEthernet0/0
     10.0.0.0/32 is subnetted, 4 subnets
O       10.2.1.1 [110/2] via 192.168.1.2, 00:12:49, FastEthernet0/0
O       10.3.1.1 [110/2] via 192.168.1.3, 00:12:50, FastEthernet0/0
C       10.1.1.1 is directly connected, Loopback0
O       10.4.1.1 [110/3] via 192.168.1.3, 00:12:50, FastEthernet0/0
                 [110/3] via 192.168.1.2, 00:12:50, FastEthernet0/0
C    192.168.1.0/24 is directly connected, FastEthernet0/0

After we do a TRACEROUTE to the destination we can see that the packets are passing trough two routers and thus load balancing the traffic:


R1#traceroute 99.99.99.99
Type escape sequence to abort.
Tracing the route to 99.99.99.99
  1 192.168.1.3 52 msec
    192.168.1.2 40 msec
    192.168.1.3 28 msec
  2 172.16.1.1 40 msec *  76 msec

OSPF has a built in Protocol Mechanism that uses parameters to calculate the same link between the host and the EDGE routers. We can disable these two "paths" using the maximum-paths command.

R1#conf t
Enter configuration commands, one per line.  End with CNTL/Z.
R1(config)#router ospf 1
R1(config-router)#maximum-paths 1
R1(config-router)#end

Now let us look at the routing table of Router 1:

R1#sh ip route
Gateway of last resort is not set
     99.0.0.0/32 is subnetted, 1 subnets
O       99.99.99.99 [110/3] via 192.168.1.2, 00:00:37, FastEthernet0/0  <<<ONE PATH>>>
     172.16.0.0/24 is subnetted, 1 subnets
O       172.16.1.0 [110/2] via 192.168.1.2, 00:00:37, FastEthernet0/0
     10.0.0.0/32 is subnetted, 4 subnets
O       10.2.1.1 [110/2] via 192.168.1.2, 00:00:37, FastEthernet0/0
O       10.3.1.1 [110/2] via 192.168.1.3, 00:00:37, FastEthernet0/0
C       10.1.1.1 is directly connected, Loopback0
O       10.4.1.1 [110/3] via 192.168.1.2, 00:00:37, FastEthernet0/0
C    192.168.1.0/24 is directly connected, FastEthernet0/0

And finally we can do a TRACEROUTE to see the packet flow to the destination of the web server:

R1#traceroute 99.99.99.99
Type escape sequence to abort.
Tracing the route to 99.99.99.99

  1 192.168.1.2 28 msec 52 msec 20 msec  <<FIRST HOPE, ONLY ONE ROUTER>>
  2 172.16.1.1 40 msec *  76 msec
R1#

OSPF can be also tuned under the interface level configuration. This can be done using the command syntax: ip load-sharing per packet. Important thing to remember is not to disable CEF on the routers, in that case you can use up all of the CPU resources. This is done , when routers needs to calculate all over again in the routing table for every load balanced network.

Feel free to comment.

Thursday, October 17, 2013

Backup Linux boot partition using Dump

Using dump to backup Linux /boot partition


Boot partition is important to load kernel so it is a good practice to back it up. I will introduce a free tool to backup a linux /boot partition called dump. The partition mounted on /boot/ contains the operating system kernel (which allows your system to boot Red Hat Enterprise Linux), along with files used during the bootstrap process. For most users, a 500 MB boot partition is sufficient.

First I will list all of the partitions on a current Centos VPS box:


We have 3 partitions. Boot partition is going to be backup-ed and destionation is the 3rd partition. The destination can be a tape drive , or a USB drive or maybe the best solution is the NFS client storage device.

The dump command is not installed by default onto the Centos distro. One can do it with very simple syntax:

yum install dump

To see the CLI options you can simply type DUMP into the BASH shell on your centos box.


I will provide some basic parametar description to clarify the switches:

– level Specifies the dump level, where n is a number between 0 and 9. For example, –0 would perform a full backup

–f filename Specifies a location ( filename) for the resulting dump file. You can make the dump file a normal file that resides on another file system, or you can write the dump file to the tape device

–z or –j Compresses each data block. The –z parameter uses zlib compression


Having that in mind we should start the compressed dump backup to a mounted drive /media/test with a filed called TEST.HDA.


To verify that the file exists and that the compression worked fine, we can see that the file size iz minimal. This is great info if the backup is needed to be copied on a FTP location using RSYNC.


There we have it. In a couple of seconds, a fully backuped /boot partition in case Disaster Recovery scenario. Hope that never happens.

Feel free to comment.


Wednesday, October 16, 2013

Setup Linux as a Microsoft Domain Controller

Setup Linux box as a Microsoft Domain Controller


In this short blog I will use three main components to setup a Centos Linux Distro as a Microsoft Domain Controller. With the last version of samba 4 comes with Active directory logon and administration protocols, including typical active directory support and full interoperability with Microsoft Active Directory servers.

To make this happen we need to setup 3 services on a Centos Linux:
  • Samba4  (also can be used for file sharing)
  • NTP server
  • Bind database (to host the AD DNS Zone)
First we must setup the Hostname of the Centos Domain Controller:

nano /etc/sysconfig/network
HOSTNAME=centos-dc

Because of a smaller and complicated setup we should disable the SeLinux capabilities:

nano /etc/sysconfig/selinux
SELINUX=disabled
setenforce 0

To tune this up we should install Dependencies on a Linux box if they are not already installed:

yum -y install gcc make wget python-devel gnutls-devel openssl-devel libacl-devel krb5-server krb5-libs krb5-workstation bind bind-libs bind-utils

Next step is to download the Samba 4 package , compile it and install it:

wget http://ftp.samba.org/pub/samba/samba-latest.tar.gz
tar -xzvf samba-latest.tar.gz
cd samba-latest/
./configure --enable-selftest
make
make install

With the new Samba4 comes the Samba-Tool to provision and configure a new domain name and to bind it with the database service:

/usr/local/samba/bin/samba-tool domain provision --realm=frogman.local --domain=FROGMAN --adminpass 'P@ssw0rd' --server-role=dc --dns-backend=BIND9_DLZ


The dns backend BIND9_DLZ uses samba4 AD to store zone information.
Edit named configuration:

rndc-confgen -a -r /dev/urandom


To allow AD queries from every machine in the LAN , we should define the port 53 available to every machine. In the named.conf forwarder must be configured to resolve remote DNS queries.

nano /etc/named.conf
options {
listen-on port 53 { any; };
forwarders {172.16.1.1; };
allow-query { any; };
tkey-gssapi-keytab "/usr/local/samba/private/dns.keytab";

include "/usr/local/samba/private/named.conf";

DNS can be configured to point to the localhost address and to define the local domain:

nano /etc/resolv.conf
nameserver 127.0.0.1
domain frogman.local

The next step is to enable the Kerberos authentification:

nano /etc/krb5.conf
[libdefaults]
default_realm = FROGMAN.LOCAL
dns_lookup_realm = false
dns_lookup_kdc = true

Configuration and installation of the NTP service follows:

wgethttp://www.eecis.udel.edu/~ntp/ntp_spool/ntp4/ntp-4.2/ntp-4.2.6p5.tar.gz
tar -xzvf ntp-4.2.6p5.tar.gz
cd ntp-4.2.6p5
./configure --enable-ntp-signd
make
make install

We must then configure permissions for the DNS zone and the associated files:

chown named:named /usr/local/samba/private/dns
chown named:named /usr/local/samba/private/dns.keytab
chmod 775 /usr/local/samba/private/dns
chmod 755 /etc/init.d/samba4
chmod 755 /etc/init.d/ntp

chkconfig --levels 235 samba4 on
chkconfig --levels 235 ntp on
chkconfig --levels 235 named on

Now we have defined all the services to start at startup. Now you can reboot the server and look if the services are all up. Myself had a problem with the namedi service. This error manifested in the /var/log as an Bind loading error.

dlz_dlopen failed to open library /usr/local/samba/modules/bind9/dlz_bind9.so'

I fixed this error assigning appropriate perrmission to the dlz_bind9.so file:

chmod 775 /usr/local/samba/modules/bind9/dlz_bind9.so


After another reboot I choose a Windows Box to test , and to add to the newly fresh created domain controller using the free Linux machine. 


And we have a Microsoft Box joined to a domain with a Linux Domain controller :D

Feel free to comment.

Tuesday, October 15, 2013

Check user Password complexity

Check password complexity using Python & Linux


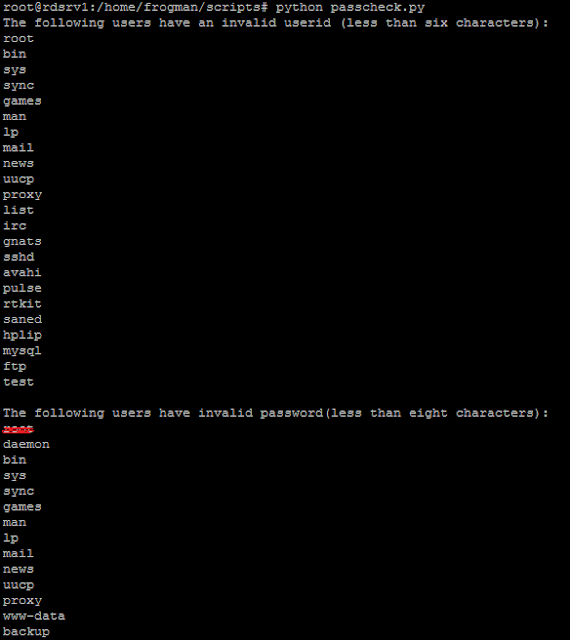
Managing security is a critical part of the job for any system administrator. Python makes this job easier, as this example illustrates. Using the PWD module this simple Python program will detect all users in the Linux distro, access the password database and check it. It checks userids and passwords for security policy compliance (in this case, that userids are at least six characters long and passwords are at least eight characters long).

<<< CODE >>>

import pwd

#initialize counters
erroruser = []
errorpass = []

#get password database
passwd_db = pwd.getpwall()

try:
    #check each user and password for validity
    for entry in passwd_db:
        username = entry[0]
        password = entry [1]
        if len(username) < 6:
            erroruser.append(username)
        if len(password) < 8:
            errorpass.append(username)

    #print results to screen
    print "The following users have an invalid userid (less than six characters):"
    for item in erroruser:
        print item
    print "\nThe following users have invalid password(less than eight characters):"
    for item in errorpass:
        print item
except:
    print "There was a problem running the script."


<<< /CODE  >>>

To test a "weak" linux distro , I will save this file as passcheck.py and run in on a virtualized Ubuntu system. I will use the syntax "python passcheck.py" under the shell mode. And this will generate the following output.


As we can see , we get a great listed output that shows us how many users have smaller user ID that 6 characters, and smaller passwords that 8 characters. 
This could prevent a serious security flaw in the system.

Fell free to comment.

File permissions list in Python

Python script file permissions list


In this small blog I will demonstrate a easy way to show listed file permissions in a Linux Distro environment. This simple script written in Python language, will use the find command under the linux shell and display results with the permissions assigned to a particular file.
Now let us take a look at the code:

<<<CODE>>>
import stat, sys, os, string, commands
#try block with a search pattern 
try:
    #run a 'find' command and assign results to a variable
    pattern = raw_input("Enter the file pattern to search for:\n")
    commandString = "find " + pattern
    commandOutput = commands.getoutput(commandString)
    findResults = string.split(commandOutput, "\n")

    #output find results, along with permissions
    print "Files:"
    print commandOutput
    print "================================"
    for file in findResults:
        mode=stat.S_IMODE(os.lstat(file)[stat.ST_MODE])
        print "\nPermissions for file ", file, ":"
        for level in "USR", "GRP", "OTH":
            for perm in "R", "W", "X":
                if mode & getattr(stat,"S_I"+perm+level):
                    print level, " has ", perm, " permission"
                else:
                    print level, " does NOT have ", perm, " permission"
except:
    print "There was a problem - check the message above"

<<</CODE>>>


Now you can take your favorite Linux text editor and save this code under a "check_F.py" file. I have created three files with different permissions to demonstrate how this script work.


As we can see there are 3 files: test01.txt, test02.tiff and test03.cdr. Now to display the list of file permissions for these file we have to run the check_F.py script. This can be achieved under the shell using the following syntax:  "python check_F.py". Next thing we can do is to type a beginning of the file name with a star sign  "t*". Then we can look at the output.


And we get a fine table output with user, group and everyone permission defined for each file. These files are listed under the current folder, but everyone can choose any other folder using the default find syntax "/etc/t*"

This is all for now. 

Feel free to comment.

Sunday, October 13, 2013

Manage Partition via GUI LVM on Centos

Centos GUI LVM


As LVM is becoming more and more mainstream, where some of the major distribution players like CentOS and Ubuntu with their latest 12.10 release, now installing on LVM by default, you may come across it sooner then you might think. With the above it will probably won’t be long before the time that you would want to administrate an LVM, to increase the space available on the volume for example… with that said, what could be more pleasant then having a nice graphical interface to do the job? Nothing, so lets install one.


Installation of the GUI LVM on Centos is as simple as it can get.
The utility that we will be using to perform the job is “system-config-lvm” from Redhat. as this utility has been repackaged for Ubuntu, the only difference between the two, is how you install it. Just type in the CLI:

yum install system-config-lvm

Once installed, you can issue the utility name with sudo for admin rights to launch it:

sudo system-config-lvm

For the ones that are using the Gnome Desktop this can be found under the System>Administration>Logical Volume Managament.


As we start the LVM GUI we can see that the tool offers us a Logical and Physical organization of the drives inside our Linux Distro.


LVM is a great tool to reconfigure your space and organize the partitions.

Feel free to comment.

Saturday, October 12, 2013

Optimal Security Settings on Centos

How to configure optimal IPtables security settings


CentOS has an extremely powerful firewall built in, commonly referred to as iptables, but more accurately is iptables/netfilter. Iptables is the userspace module, the bit that you, the user, interact with at the command line to enter firewall rules into predefined tables. Netfilter is a kernel module, built into the kernel, that actually does the filtering. There are many GUI front ends for iptables that allow users to add or define rules based on a point and click user interface, but these often lack the flexibility of using the command line interface and limit the users understanding of what's really happening. We're going to learn the command line interface of iptables.


Iptables places rules into predefined chains (INPUT, OUTPUT and FORWARD) that are checked against any network traffic (IP packets) relevant to those chains and a decision is made about what to do with each packet based upon the outcome of those rules, i.e. accepting or dropping the packet. These actions are referred to as targets, of which the two most common predefined targets are DROP to drop a packet or ACCEPT to accept a packet.

Chains

These are 3 predefined chains in the filter table to which we can add rules for processing IP packets passing through those chains. These chains are:

INPUT - All packets destined for the host computer.
OUTPUT - All packets originating from the host computer.
FORWARD - All packets neither destined for nor originating from the host computer, but passing through (routed by) the host computer. This chain is used if you are using your computer as a router.
For the most part, we are going to be dealing with the INPUT chain to filter packets entering our machine - that is, keeping the bad guys out.

So let us see the initial CLI commands. All of the freshly installed Centos machines have not IPTables rules defined. But just to be sure we will flush all of the settings.

iptables -F

Another rule we can add is to prevent SYN flood attacks, and to block the TCP packets that have the NULL value in the header. These packets are usually destined to DDOS the remote server.

iptables -A INPUT -p tcp --tcp-flags ALL NONE -j DROP

iptables -A INPUT -p tcp ! --syn -m state --state NEW -j DROP

In information technology, a Christmas tree packet is a packet with every single option set for whatever protocol is in use. We should also apply a packet filter to deny the XMAS packets.

iptables -A INPUT -p tcp --tcp-flags ALL ALL -j DROP

Now we can start adding selected services to our firewall filter. The first such thing is a localhost interface. We tell iptables to add (-A) a rule to the incoming (INPUT) filter table any trafic that comes to localhost interface (-i lo) and to accept (-j ACCEPT) it. Localhost is often used for, ie. your website or email server communicating with a database locally installed.

iptables -A INPUT -i lo -j ACCEPT

Now we should add some basic input chain filter for WEB and SMTP traffic.

iptables -A INPUT -p tcp -m tcp --dport 80 -j ACCEPT
iptables -A INPUT -p tcp -m tcp --dport 443 -j ACCEPT
iptables -A INPUT -p tcp -m tcp --dport 80 -j ACCEPT

iptables -A INPUT -p tcp -m tcp --dport 443 -j ACCEPT

The next thing is to allow SSH traffic for remote managament of the Centos server.

iptables -A INPUT -p tcp -m tcp --dport 22 -j ACCEPT

To wrap up the CHAIN settings we should allow ESTABLISHED connections out of the Centos Server.

iptables -I INPUT -m state --state ESTABLISHED,RELATED -j ACCEPT

The last setting before saving the iptables rules is to allow all OUTGOING connections and to block every other traffic towards our Centos Server.

iptables -P OUTPUT ACCEPT

iptables -P INPUT DROP

Finally , when we have done the basic setup we must save all of the settings to a file.

iptables-save /etc/sysconfig/iptables

This is all that is needed for an optimal Firewall settings. More to come.

Feel free to comment.


Useful Linux Commands

10 Useful Linux Commands


Simply put, the command line is powerful; an army of tools exist that can take what would be a tedious job in a graphical program and turn it into a task that takes just a few seconds. Removing the last four lines in every row of a large file would be a lengthy process in a graphical application, but can become trivial and automated on the command line.
Flexibility aside, it's also important to note that some Linux systems lack a graphical interface at all and that some systems may become damaged in such a way as to make it impossible to bring up anything other than the command prompt. In these cases it's important to be able to navigate on the command line with enough proficiency to perform whatever tasks need to be done from backing up some files to disabling a dying piece of hardware.


The commands used at the command line may seem a little cryptic due to their tendency to be very short. This is because the roots of the Linux command line are from systems where a single letter entry could take a significant amount of time to travel from a terminal, to a central server and back to the terminal where it was printed onto a roll of paper. In those old systems, the shorter the input was, the better, as it meant less time waiting to issue your command and receive output. The best thing you can do to remember what commands stand for is to find out what word the command is an abbreviation for. This can go a long way to remembering the command later.

1. Command is LS
The command “ls” stands for (List Directory Contents), List the contents of the folder, be it file or folder, from which it runs.


Command “ls -a“, list the content of folder, including hidden files starting with ‘.’.


2. Command is LSBLK

The “lsblk” stands for (List Block Devices), print block devices by their assigned name (but not RAM) on the standard output in a tree-like fashion.


Note: lsblk is very useful and easiest way to know the name of New Usb Device you just plugged in, especially when you have to deal with disk/blocks in terminal.

3. Command is MD5SUM

The “md5sum” stands for (Compute and Check MD5 Message Digest), md5 checksum (commonly called hash) is used to match or verify integrity of files that may have changed as a result of a faulty file transfer, a disk error or non-malicious interference.


4. Command UNAME

The “uname” command stands for (Unix Name), print detailed information about the machine name, Operating System and Kernel.


5. Command HISTORY

The “history” command stands for History (Event) Record, it prints the history of long list of executed commands in terminal.


6. Command SUDO

The “sudo” (super user do) command allows a permitted user to execute a command as the superuser or another user, as specified by the security policy in the sudoers list.


7. Command MKDIR

The “mkdir” (Make directory) command create a new directory with name path. However is the directory already exists, it will return an error message “cannot create folder, folder already exists”.


8. Command TOUCH

The “touch” command stands for (Update the access and modification times of each FILE to the current time). touch command creates the file, only if it doesn’t exist. If the file already exists it will update the timestamp and not the contents of the file.


9. Command CHMOD

The Linux “chmod” command stands for (change file mode bits). chmod changes the file mode (permission) of each given file, folder, script, etc.. according to mode asked for.
There exist 3 types of permission on a file (folder or anything but to keep things simple we will be using file).


10. Command CP

The “copy” stands for (Copy), it copies a file from one location to another location.


There are more useful commands to implement in Linux enviroment. This are some 10 basic day to day commands.

Feel free to comment.


Friday, October 11, 2013

Netapp Intial Setup

Netapp Storage Initial Setup


Before we start to setup the Netapp storage filers and appliance, one must create a Netapp NOW account. This can be done via the http://now.netapp.com web site. 
The usual waiting period is about 24/48 hours until you receive the notification email. The Now account gives you access to the documentation and the community. Depending on your license you can get the complete 24/7 support. This is very good in situations where you get stuck and do not have enough time to solve the problems with your storage. I will not provide informations on how to setup and cable the equipment in the Rack, because I am using the virtualized appliance to simulate all the setups in this blog. The initial setup would be started using the console cable, but in this scenario we are using VMware to simulate the console. When starting up the filer and connecting to the management console (serial cable, COM1 etc, all default settings if using a Windows machine with Putty) you'll see a configuration setup. Simply answer the questions, and don't be shy if you're not sure, everything can be changed afterwards.

We can take a look at the boot options that our virtualized Netapp Storage systems offers us. 


I have choosen the Option 4 to have a clean install , as a fabric deployment of the Netapp filer. After zeroing the hard disks inside the filer , we get the first option to change and that is the 1. Hostname of the filer. I will use the testfiler hostname. Tip: When Netapp support refer to your controllers, they refer to them as top or bottom.

2. Do you want to configure interface groups ? (On the back of our FAS we have 4 gigethernet ports named e0a, e0b, e0c, e0d. You have the option of bundling 2 or more of these to create an etherchannel to your switch. This becomes beneficial if you are considering running iscsi, nfs or cifs as the traffic can be load balanced across the bundled ports. I will choose no because I do not need it for the test scenario.
Next what needs to be done is to define IP addresses of networks connected. We can type in the addresses of the bridged interfaces from the VMware Virtual Machine. We can decide to use only one NIC, but I will configure all four of them.

3. You now have the option to continue setting up via the web interface or through the cli. We will continue through the Command Line interface.

4. Please enter the name or ip address of the default gateway. This is useful for routing and updating the FAS software.

5. Please enter the name or ip address for aadministrative host. The administration host is given root access to the storage system’s /etc files for system administration. To allow /etc root access to all NFS clients enter RETURN below. I will choose the Enter solution, because I do not need this much security in this testing scenario.

6. Please enter timezone (GMT is the default, please refer to the setup.pdf documentation in the Resource area of this site).

7. Where is the filer located ? (This is SNMP location information). You can leave it blank for starting setup.

8. What language will be used for multiprotocol files ? (en for english otherwise refer to the setup.pdf documentation in the Resource area of this site). I chose English.

9. Enter the root directory for HTTP files (Files that are served through HTTP or HTTPS)

10. Do you want to run DNS resolver ? (Basically do you want to storage system to resolve DNS, select yes).


11. Do you want to run NIS client ? If you have a Network Information Server you can choose yes. Otherwise, like I did choose no.

12. Do you want to configure the Shelf Alternate Control Path Management interface for SAS shelves ? In this test scenario we will choose NO.

13. Setting the administrative (root) password for your filer ? (Enter the password and re-enter to confirm) and reboot. In the real world scenario always use the Strong password.

14. If you are configuring the controllers for an active/active pair, repeat the same steps for the other controller. This can be done if one wants to virtualize more Netapp storage device to create a cluster mode. This I will not do , because this is an initial setup of the storage system.

15. Once the filer has rebooted you can access the web admin page type at https://<ip address>/na_admin


And finally we get the WEB http admin page where we can go on to configure some advanced features that I will talk about later. 

So more to come about Netapp , which is by the way now bought by IBM, so it is even getting better support.

Feel free to comment.


Tuesday, October 8, 2013

Linux Run Levels

Linux run levels details


After the Linux kernel has booted, the init program reads the /etc/inittab file to determine the behavior for each runlevel. Unless the user specifies another value as a kernel boot parameter, the system will attempt to enter (start) the default runlevel.

Here is an example of stanard run Levels under Centos Linux.

RL           Mode                               Action
0              Halt                                  Shuts down system
1              Single-User Mode            Does not configure network interfaces, start daemons,no root logins
2              Multi-User Mode               Does not configure network interfaces or start daemons.
3              Multi-User Mode 
                with  Networking               Starts the system normally.
4              Undefined                          Not used/User-definable
5              X11                                    As runlevel 3 + display manager(X)
6              Reboot                              Reboots the system

Most Linux servers lack a graphical user interface and therefore start in runlevel 3. Servers with a GUI and desktop Unix systems start runlevel 5. When a server is issued a reboot command, it enters runlevel 6.

To see what level is currently using your Distro, you can use the who -r command.


Linux also uses the init scripts to initialize proper service to the user. Init (short for initialization) is the program on Unix and Unix-like systems that spawns all other processes. It runs as a daemon and typically has PID 1.

The /etc/inittab file is used to set the default run level for the system. This is the runlevel that a system will start up on upon reboot. The applications that are started by init are located in the /etc/rc.d folder. Within this directory there is a separate folder for each run level, eg rc0.d, rc1.d, and so on.

The chkconfig tool is used in Red Hat based systems (like CentOS) to control what services are started at which runlevels. Running the command chkconfig –list will display a list of services whether they are enabled or disabled for each runlevel.

On the next graphic we can list the current scripts that have been configured to run at certain levels, or not to run on certain run levels in a Centos enviroment.


Single User mode is a mode that a multi-user system (like a Linux server) can be booted into the operating system as a superuser. Booting a system into this mode does not start networking, but can be used to make changes to any configuration files on the server. One of the most common usages for single-user mode is to change the root password for a server on which the current password is unknown.

Runlevels are an important part of the core of the Linux operating system. While not something the average administrator will work with on a daily basis, understanding runlevels gives the administrator another layer of control and flexibility over the servers they manage.

As we have seen here, the traditional method of booting a Linux system is based on the UNIX System V init process. It involves loading an initial RAM disk (initrd) and then passing control to a program called init, a program that is usually installed as part of the sysvinit package. The init program is the first process in the system and has PID (Process ID) 1. It runs a series of scripts in a predefined order to bring up the system. If something that is expected is not available, the init process typically waits until it is. While this worked adequately for systems where everything is known and connected when the system starts, modern systems with hot-pluggable devices, network file systems, and even network interfaces that may not be available at start time present new challenges

Monday, October 7, 2013

Red Hat Linux hardware discovery tools

RHEL hardware discovery tools


During the Linux kernel loading it discovers the and scans the drivers for a particular Virtual Machine it runs on. After the init procedure linux kernel loads the drivers to support the detected hardware. Examining kernel boot messages is a good way to determine the hardware your are renting for performance issues and simply to know on what "rig" you are working on. 
There are some simple tools I am used to play with to check the current hardware for issues. First one I would like to introduce is the Hardware Abstraction Layer database checker - lshal.


The system output tells us the Bios version of the VM or a physical machine, and serial numbers attached to the same. As we can see this linux kernel is run on a vSphere ESXi virtual machine emulating the Phoenix Technologies bios, which is typical for VMware.

If one wants to get the information about the virtual CPUs or the actual physical ones on their VPS system, this information can be extracted from the /proc folder under the root of the file system.

 From the output of this hardware tool we can see that we are using Genuine Intel two Xeon CPUs. The clock, cache, fpu and family are also displayed so we can get a clear picture of what performance we can expect from this VPS system.

The linux console system can use either the Standard Vga driver, or a video chipset specific modular frame buffer driver. The vga driver is always present in the kernel and will bind automatically to the console if no other is active. To display which driver is used on this particular VPS we can concatenate and display this information from the vtcon0 folder.

[root@cent-01 /]# cat /sys/class/vtconsole/vtcon0/name
(S) VGA+
[root@cent-01 /]#

This particular VPS system is using the Standard VGA kernel driver, so we can determine the no other is loaded into the frame.

Thanks for reading. 

Feel free to comment !